Monday, November 4, 2013

Paper dust

Paper dust is all I have left, well almost.
 
If you recall, at the end of September I assembled a card/tag making kit. The kit included 6 sheets of paper (3 of which were double sided), 5 stamps, 4 inks, 3 embellishments, 2 ribbons and 1 drink of choice. PJ challenged us to remain within the limitations of our kit and create cards and tags until there were no paper sheets left, only paper dust.


It was definitely a challenge, especially the 4 inks limitation. I love my inks and wanted to use more ink colours. I am not sure if I cheated by using Copic markers to colour Santa, probably. The other biggest challenge was not being able to use my arsenal of supplies to correct my errors. If I made a mistake I couldn't use other inks or papers to make the mistake look better or less noticeable.
 
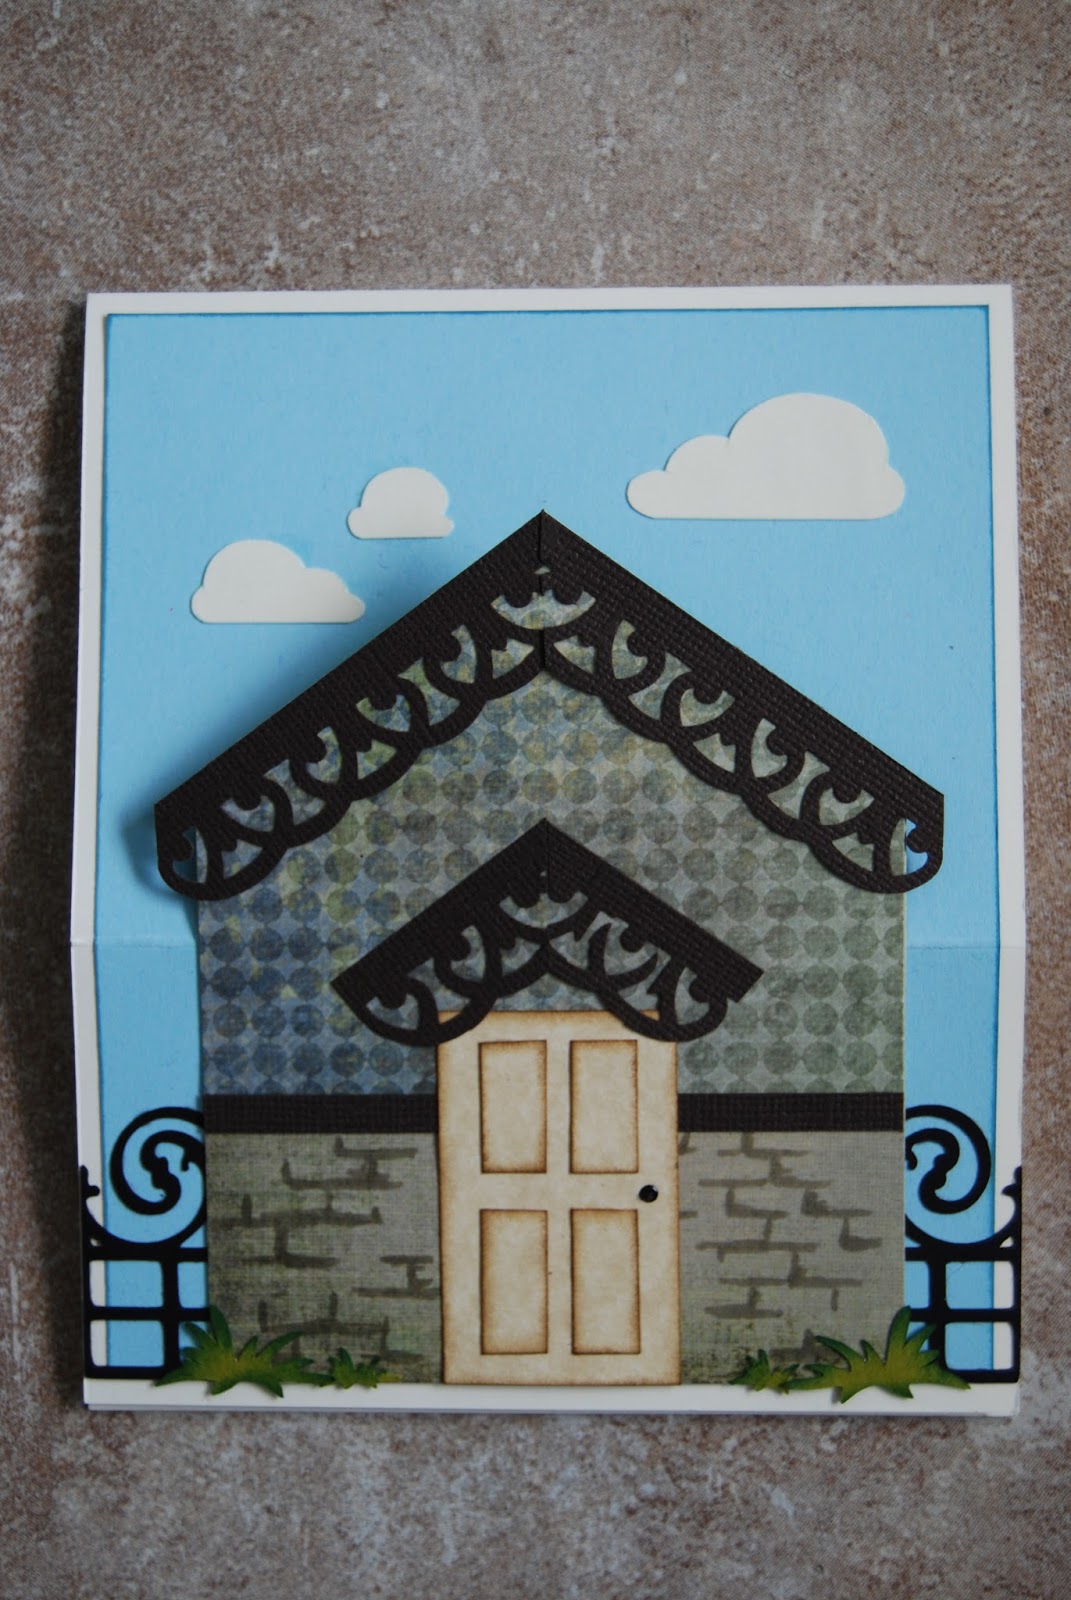
With my kit I was able to create 7 cards and 9 tags. Some projects turned out better than others but I had fun just the same. Unfortunately, due to Internet failure I was not able to upload my projects before the PJ Challenge deadline (midnight November 3rd).


Which one is your favorite?


Till next time, Happy Paper Crafting!

 
Supplies used from inventory:
  • Bazzill Avalanche paper
  • Stampin' pad - Baja Breeze
  • Blending tool
  • Bazzill Basics Paper - Chipboard tags snowflakes
  • Archival ink - black
  • Stampin'up stamps - Welcome Christmas, snowflakes, and Jolliest Time of the Year
  • Winterland - snow peeps
  • Paper Bliss adhesive accents
  • Harmonie - Meli Melo
  • Copic markers - 100, C5, C3, R24, G29, YG03, E01
  • Distress ink - peeled paint
  • Big Shot
  • Spellbinders Nestibilities - labels, blossom two, and create a flake four
  • Tombow glue
  • Lil'inkers - stitched mats and bow dies
  • Stickles - xmas red
  • Creative memories corner rounder
  • Celebrate It - Ribbon bow-tique
  • Stampin'up - Cherry Cobbler ribbon
  • Martha Stewart - photo corners punch
  • Martha Stewart - scor board
  • Zapdots - foam tape
  • EK Success - 3/4 inch circle punch
  • Stampin'up, EK Success - label punch
  • Spellbinder shapeabilities - snowflake pendant
  • Fiskar personal paper trimmer
  • Scotch advanced tape glider
  • There are a couple of other supplies that I no longer have the name of the company that made them
 

Supplies purchased:
  • None


Tuesday, September 24, 2013

Card and Tag Kit

Hello everyone. 
 
PJ Challenge has posted a very interesting challenge. The challenge is in two parts. The first part, due by September 30th, is to assemble a package based on a pre-set list.
  • 6 papers
  • 5 stamps
  • 4 inks
  • 3 embellishments
  • 2 ribbons, and
  • 1 drink of choice
Here are my items. Three of the papers are double sided, hence the almost identical pictures.
 
The second paper from the right is maroon (not brown).

From left, the double sided papers are 1, 3, and 6
 
 
You will notice 4 ribbons in the picture but I will only use two of the four. I didn't want to unravel one of them just for the sake of the picture.
 
My drink of choice is in the blue cylinder at the top left of the pictures. It recently changed to water, trying to become a little healthier and shed a few useless pounds.
 
Are you asking "so, what is part two of the challenge?" I would be happy to tell you. The second part, due November 1st, is to use the items in this package to make cards and tags. The goal is to use as much of the items as possible. To use every piece of paper until there is only paper dust left.
 
So if this challenge peeks your interest as it has mine, either join the challenge or come back in November to see what I have created.
 
Till then, happy crafting.


Thursday, September 12, 2013

Votives and Vinyl

I am entering this project into the Fantabulous Cricut Challenge Blog, Challenge #177 - Vinyl for a chance to win a Cricut Expression from Cricket Vinyl Supplies .com. Cricket Vinyl Supplies .com will give away a Cricut Expression, the Jasmine cartridge and a load of vinyl if 100 people or more post their projects where they used vinyl and a Cricut machine.

The centre pieces at our wedding were potted herb plants circled by 5 votives. I brainstormed for days on what I could do to give the votives a little more decor factor. I tested etching, ribbons and decided that the best, easiest and prettiest way to decorate the votives would be to use our vinyl supply and my Cricut Expression to cut wedding related images. With the help of my parents, I used the Tie the Knot cartridge (blackout LoveBrds, Mr&Mrs) and the Calligraphy Collection cartridge (Matrimony Phras6-s, Gratitude Phras6-s, Inspiration Blackout Phras1-s) for the votive cutouts.


This was my first time creating a project using vinyl. However, my parents have a significant amount of experience cutting vinyl and graciously offered to help me. My dad owns a Roland Camm 1 PNC 1050 cutter. It is a commercial cutter and I love to tease him that it's just a bigger version of my Cricut.

I loved working with the vinyl. At times it was much easier than working with paper or cardstock. I found that the Cricut can cut a much more detailed, delicate image on vinyl. I will definitely use vinyl again in a future project.

Sunday, September 1, 2013

Easel cards

It has been a while since my last post. I have been busy making 200 wedding programs and over 300 table seating cards for a couple getting married on Sunday, September 1st. Congratulations to the happy couple!
 
I have returned to my craft room and excited to create more layouts, cards and any other craft that tickles my fancy.
 
I created these two cards primarily for friends of mine but also for PJ Challenge's September Motivator.
 
The focus for the September Motivator is to get us to try something new and provide the steps or links to the steps so others can try it too.
 
Making these cards not only motivated me to try a new technique - easel cards but also to do something I haven't done in a very long time - colour!


Easel cards are a fantastic way to display your greetings and well wishes. They will lie flat when closed and then you prop them open for display.


Last fall I got my first glance at the mechanics behind an easel card at a Make & Take. What is a Make & Take? It is where someone teaches you how to make something and then you get to take it home, sometimes with written instructions. The easel cards are quite easy to make.

 
To create a 5 x 5 1/2 inch top fold card:
 
  • Cut a piece of paper to 5 x 11 (this will become the base of your card).
  • Cut a piece of paper to 5 x 5 1/2 (this will become the decorated top panel of your card).
  • Place the larger piece of paper, long side horizontally on your score board.
  • Score the paper at the 2 3/4 inch mark and then again at the 5 1/2 mark.
  • Fold the card in half at the 5 1/2 score line.
  • Decorate the top panel piece, the 5 x 5 1/2 piece of paper, as desired.
  • Adhere the decorated panel to the 2 3/4 inch portion of the base card, the one closest to the short edge.
  • Adhere a message or decorative element, using foam dots to give it some height, centered in the middle to lower portion of the inside of the card. This becomes the stopper when the card is propped open.

 
The Comfort Food card makes me giggle. The card was created following the same instructions as above. However, given  enough time, I usually go above and beyond. On this card I applied a second new technique; colouring with Odorless Mineral Spirits (OMS). Colouring with OMS is not difficult but it is a little time consuming. Essentially you are colouring the same image twice, once with the colouring pencils and then again with a blending stub and the mineral spirits. I love the way the technique blends the pencil lines and gives the drawing a much smoother, softer look. I am going to use this technique in my other drawings.


I learned this technique from Trudy Sjolander a guest blogger on CardMaker blog and you can find her instructions here.
 
Hope you enjoyed these new techniques as much as I did. I can't wait to try the double twisted easel card.
 
Until next time, happy crafting!
 
 
From my supplies inventory:
 
   For the Welcome Home card
  • Stampin'up - Baja Breeze classic ink pad
  • Tombow
  • Fiskar personal paper trimmer
  • Scotch Advance tape glider
  • Martha Stewart scoring board
  • Martha Stewart punch around the page - French Scroll
  • Cricut cartridge - Straight from the Nest (fence, tree 1), Pooh and Friends (Tigger 3 icon)
  • Distress ink - pine needles, gathered twigs
  • Pearl pen - Viva Decor - black
  • Copic W5
  • Zapdots - foam dots
  • Big Shot
  • Cricut Expression
  • Lil'inkers stitched mats die
  • Scrap paper
  • Recollections cardstock
  • Cardstock from Costco
  • DCWV's The Great Vacation Stack

 
For the Comfort Food card
 
  • Various cardstock
  • Whimsy stamps - Big Comfy Cake
  • StazOn jet black ink
  • Prisma colouring pencils #345, 368, 329, 328, 370, 313, 305, 342, 336
  • Copic markers W1
  • Quick Quotes paper - Julie je t'aime
  • Fiskar personal paper trimmer
  • Martha Stewart scoring board
  • Scotch Advance tape glider
  • Distress ink - seedless preserves
  • Crop-a-dile corner chomper
  • Stampin'up - Sincere Salutations stamps
  • Zapdots - foam dots
  •  
Supplies purchased:
 
For the Welcome Home card
  • Nothing
 
For the Comfort Food card
  • Blending stub
  • Gamsol orderless mineral spirits


Friday, July 26, 2013

Let the Season-ing Begin

This week Simon Says Stamp's Wednesday Challenge is to create a card with a summer food and/or drink theme.

The card I created was inspired by a gentleman at work who asked "Can you make a card with food?"

Well, yes, yes, I can; at least with a food theme.

It was also inspired by Kim Reid's "When I Need You" card in the CardMaker magazine, Summer 2013 issue. I enjoy the style of her card.

I had the idea, had the supplies and usually it ends there. However, due to the intent of Three Cs blog  "to get motivated to use the supplies I have hoarded for years and to push my creativity to the next level" and a very inspiring challenge from Simon Says Stamps I got working in my craft room getting thought to paper.


This card challenged me a bit more than the first three cards posted. I wanted to cut the little man using the Block Party Cricut Cartridge but did not have any skin colour paper. Nor did I like my choice of paper for his hair. I opted to cut these items in white and used Copic marker E01 & E11 to give him his skin tone and E37 & E77 for his hair colour. I also used Copic marker C3 to shade his chefs hat and the metallic items.


The other challenge was the salt and pepper shakers. I tried different techniques and products in order to achieve the metallic look for the bottle covers, as well as a salt and pepper look to its contents.

My first try was Glitter Ritz but that was too shiny.

The second try was colouring the different parts of the bottle with the Copic markers - not quite the result I wanted.

Third try was to emboss. Third try is always the charm. I cut out two sets of the salt and pepper shakers. The first set, I cut the tops off and embossed them with the Martha Stewart - sterling silver embossing powder. The second set, I roughly embossed the salt bottle with Martha Stewart's bright white embossing powder hoping to keep a grainy look to the powder. The pepper bottle, I embossed it in two layers. the first layer was embossed with black powder, then I reapplied the Big & Bossy embossing ink and lightly sprinkled with the bright white powder. I finished the bottles by gluing the metallic covers to the embossed bottles. The look that I got, with the supplies I had, is probably the closest I would get to looking like the real deal.


My photography skills did not pick up the details of the salt.


Items from my inventory used to make this card:
  • Various card stock and pattern paper
  • Block Party - Cricut Lite - Dad 1 and Grill 1
  • Copic markers
    • hair - E37, E77
    • skin - E01, E11
    • metal and shadows - C3
    • grass - YG63
    • sky - B0000
  • Tombow glue
  • Circut Expression
  • Recollections - brown cardstock
  • Stampin'up - Classic stamping pad - Cherry cobbler and Sahara sand
  • Circle stamp - unknown
  • Unity Stamp - Splatter it
  • Fiskar paper trimmer
  • Viva decor - Pearl pen - cream and black
  • Cricut cartridge - From my Kitchen - salt & pepper
  • Martha Stewart - sterling embossing powder
  • Big & Bossy - embossing ink pad
  • Marvy Embossing heat tool
  • Zapdots foam dots
  • Sharpie permanent marker
  • Stampendous! black embossing powder

Purchased:
  • Nothing 


Sunday, July 14, 2013

Like Father Like Son

My son looked like my husband from day one. The only thing he was missing was the goatee.

He is a year and a half now and loves to do everything like daddy; reads the flyers, dunks his grill cheese in ketchup, brings his sippy cup to the lounge chair - climbs in - sits down - relaxes and watches tv.

This drawing was fitting for a father's day gift. I know, I am a little late posting it.

I have always been fascinated with illusion type illustrations. When I saw this picture on Pinterest 3D Hand Image, it peaked my interest. I studied the method and the colours, practiced a couple of times, tested different mediums - markers, pencils and ended up liking the effects of Copic markers. The Copic markers I used were W5, W7, BG18, BG75 and BG72.

Here is the final project.


From my inventory:
  • Copic markers
    • W5, W7, BG18, BG75, BG72
  • Various scrap paper
  • Zapdots foam dots
  • Recollection white cardstock
 
Purchased:
  • The frame at Michaels (I cannot remember the company name, sorry)
  •  


Sunday, June 30, 2013

Halloween 2012

For my birthday every year, I treat myself to a day off from work (my day job).
It's a "Me Day!"

This year it was extra special because I treated myself not only to a day off from work but a complete guilt-free day in my craft room. Well, at least until 5pm when I had to pick-up my son from daycare. 

My focus for the day was to create a 2 page layout of my son's first Halloween using this kit that I purchased at Scrap en Masse.


The kit is perfect. It has pictures of little monsters, it has colours that go well with his Halloween costume and it has a very boy feel to it, but if you think about it, what Halloween paper doesn't?

I really stepped out of my comfort zone on this one. I enjoy creating subtle layouts. Whereas this one is very busy. There is a lot of things going on within these pages.

To protect the privacy of my family and friends - all identities in the photos will be blurred. 

I realized two things while scrapping these memories. You use a lot more supplies in scrapbook pages than you do in cards (see the list of supplies below) and each item that you add to the page needs a little extra TLC to make them stand on their own. A picture is just a picture until you frame it; a piece of paper is just a piece of paper until you stamp it, distress it, pop it up; a die cut is just a die cut until you ink it, or draw in some details. Without the extra attention to each element, the paper, embellishments and photos just seem to melt together into one big layout puddle.


The fence started out as plain yellow cardstock suitably shaped using the Sizzix Fence Die. When I placed it on the background paper, the fence disappeared, swallowed up by all those monsters. I stamped the fence with Magenta - Crackle Background and Tim Holtz Vintage Photo ink. Still it was missing something. The stamping helped but the fence was being swept away by the loudness of the background paper. I inked/distressed the left side of each piece of wood with the same Vintage Photo ink and that appeared to do the trick.

Other elements that were getting lost were the sign and my son's picture. The picture was a simple solution. I gave it a much bigger black mat. For the sign, I chose to outline the iron hanger with a silver pen and distressed the sign with Tim Holtz Forest Moss ink.

To protect the privacy of my family and friends - all identities in the photos will be blurred.

I am definitely going to take a different approach on my next scrapbook layout, giving each element a little extra attention. 

I am presenting this layout in PJ Challenge "Our very first motivator" on June 30th. Their September motivator is to use new techniques in our projects. I can't wait to push my comfort level again.

"A mind that is stretched by a new experience can never go back to its old dimensions"
                             - Oliver Wendell Holmes, Jr.

Supplies from my inventory:
  • Tim Holtz distress inks
    • Dusty Concord
    • Vintage Photo
    • Rusty Hinge
    • Forest Moss
  • Scotch Advance tape glider
  • Cricut Expression
  • Cricut Cartridge - Paper Doll Dress Up - Costume-s
  • Scrap pieces of cardstock
  • Tombow glue
  • Fiskars paper trimmer
  • Recollections - spiced market cardstock
  • Sizzix Die - fence
  • Magenta rubber stamp
  • Copic B91
  • Tim Holtz - Hanging Sign die
  • Creative Memories
    • fine tip marker
    • precious elements pen
  • Glossy Accent
  • Zapdots
  • ContainYa Crafts - Scrap'n Easel

Purchased:
  • The scrapbook kit


Sunday, June 16, 2013

Happy Father's Day

My dad has always taken interest in our activities and all events of our lives. He is the only male in a family of 4 (although he now has 2 grandsons and a granddaughter). He had no choice but to take interest in some of the more girly aspects of our lives, one of them being crafts.

A while back my dad gave me a piece of birch bark and said that it was a nice piece with some nice usable areas. He had collected the bark on one of their nature walks and thought I might be able to use it somehow in one of my cards.

When someone contributes to my love for crafts, I try to use their present, be it a stamp, paper supplies, even a piece of nature, in a gift I can give back to them.

I knew I wanted to use the bark in my dad’s father’s day card. It took a while to come up with a masculine idea that would display the precious piece of nature. I love the slight irony of stamping an image of a tree on a piece of a tree.


Heather’s Stamping Haven and a camping weekend at Murphy’s Point was a huge help towards the production of this card. I spoke to; whom I can only assume was Heather – what a helpful, knowledgeable woman who has tried many products and techniques including stamping on birch bark.

I told her what I was looking to do, what my vision was and she suggested the best products to use and the best methods to apply to increase my rate of success.

Heather brought my attention to the beautiful Cling Tree Poem stamp. My first intentions were to heat emboss the image but she recommended because of the details in the words that I simply stamp the image using StazOn, an ink that is suitable for all sorts of surfaces including a possible nonporous bark.

Her concern, and mine, was that she had never stamped on the back side of the birch bark and I did not have enough bark to do a test run. That’s where the camping weekend comes in. At Murphy’s Point, we were surrounded by fallen birch trees. Some bark samples made their way home with me, along with a few tiny black ants (I think I am going to stay away from including nature in my projects. I do not need little critters crawling around my craft table).  

I am glad for the bark samples. It took a couple of tries to get the right amount of applied stamping pressure. I stamped the image onto the piece of bark and stamped the same image onto the white paper, each seperately. The two images were taped together aligning the images like you would with wallpaper.


I am pleased with this card. I think my dad will be happy with what I have done with his gift.

Happy Father’s Day to my dad and to all you fathers!!


From my inventory:
  • Fiskar paper trimmer
  • Tim Holtz scissors
  • Creative Memories paper trimmer
  • We R Memory Keepers - Urban Window Collection
  • Recollection - Green Faux Canvas
  • Tombow glue
  • Various cardstock
  • Birch bark
  • Kool Tak - 2 sided tape

Purchased:
  • Stampendous - Cling Tree Poem stamp
  • StazOn - jet black ink

Friday, May 24, 2013

Welcome Little One

This week’s Fantabulous Cricut Challenge is Oh Baby!  We are to use our Cricut to create a project for a new baby. This challenge could not have come at a better time. Many of our friends are pregnant and some are due within the next few weeks.
I made this card for a little one we are looking forward to meeting at the end of June. The expecting parents decorated the little one’s room with a frog theme.

I had a blast making this card. The little Cricut characters always make me laugh.
This card was made possible by:
Items from my inventory
·         The Cricut Expression
·         Paisley Cachemire cartridge – frog2
·         Cindy Loo cartridge – welcome
·         Various cardstock
·         Creative Memories corner maker
·         Fiskars paper trimmer
·         Bella BLVD – Toadilly Cool – Birthday Boy paper
·         Tim Holtz distress ink – Iced Spruce, Rusty Hinge, Forest Moss
·         Tombow glue
·         Celebrate It – ribbon
·         Kool Tak – 1/8” adhesive tape
·         Zapdots foam dots
·         Stampin’up Holidays & Wishes stamp
·         Stampin’up basic black classic stampin’ pad
·         Big Shot
·         Sizzix texture plates

Purchased
·         Nothing


Wednesday, May 22, 2013

Just Add Metal

Hello Everyone,
Over the past couple of weeks I have been familiarizing myself with the blogging world by reading other crafting blogs, mostly blogs on scrapbooking and card making. It is fantastic to see people’s creativity with such a simple product like paper.
I found in my search, DT Calls. They provide a list of 95 web addresses to different monthly, bi-weekly, weekly and daily challenges.  
Besties Challenge Blog is amongst the 95 addresses listed. Sherri Baldy, owner and author of Besties Challenge Blog doesn’t only post weekly challenges but also provides a list of upcoming challenges so that you can plan ahead. The challenge for May 27th is to “add metal to your card”. I jumped all over that challenge since I had ideas and the supplies to bring it to fruition.
Card done! Happy about the addition of metal! Can’t wait to show people! Very excited!!!
Then I reread the challenge rules on Besties Challenge Blog. It appears that in my excitement I misread them the first time. I did follow the spirit of the challenge and added metal to the card, but I also had to add a Bestie image. My card does not qualify for the challenge or for a chance to win some Bestie images but I am still pleased with the card and will give it to my husband for father’s day.  
I think the card is quite appropriate for him. Not only is it very manly but it has a vehicle/machine type of look to it.  He is a mechanic at heart, has a love for automotive and remembers every single customer by the vehicle they own.


For the metal look, I passed a piece of Art Emboss medium weight aluminum in the Spellbinder M-bossabilities EL-017 folder through the Big Shot. To save anyone from “paper cuts”, I folded under all the cut edges of the aluminum (I am cringing at the thought of an aluminum cut). Each piece of aluminum was then taped to a distressed and inked piece of cardstock.

This card was brought to you by the following supplies:

From my inventory:
· Art Emboss medium aluminum
· Spellbinders M-bossabilities EL-017
· Big Shot
· EK Success - Binding Edge Edger Punch
· Making Memories distress tool
· Tim Holtz - walnut distress ink
· K&Company Engraved Garden adhesive chipboard
· Various cardstock
· Brads
· Zapdots - foam dots
· EK Success - Major League baseball stickers
· Scotch - Advance tape glider


Purchased:

· Nothing

Total Visits